Noilly Prattle: June 2013

Saturday, June 29, 2013

Loquat Wot!

very narrow backyard
     There's this Loquat tree in my backyard that's been sitting there for years.

      I never paid it much attention except that it served as a kind of screen between our house and the neighbor's a scant three or four meters away. Unfortunately, it's the back of the neighbor's house and looks rather like a small junk yard, so the loquat tree served us well hiding the junk even though it never seemed to produce any edible fruit. What piddling little shriveled loquats did appear usually got eaten by bugs or birds or just simply rotted on the tree.

ripe loquats
      In the past year or two, though, we started to throw some fertilizer on the ground around the trunk of the tree and lo and behold it produced quite a tidy amount of edible loquats this year. Well, wot to do with loquats?

      A Google search on the web came up with lots of ideas for cooking with them so we tried a few of them and they turned out to add some nice variety to our daily bread fare. Thought I'd turn you on to a couple recipes should you happen to have a loquat tree in your yard or can hit up a neighbor for a few. The first one is a main dish using fresh tuna fish.


Pan-Seared Tuna over Arugula with Loquat Salsa

zesting the lime
main ingredients for loquat salsa
      First you make the salsa. For two cups use 1½ cups of loquats with seeds and membrane removed and diced; ½ cup of diced red onion; 1 or 2 jalapeno peppers (depending on how hot you like it), finely chopped; zest and juice of 1 lime; 1 tsp. salt; 1 tbs. honey. Combine all the ingredients in a bowl or jar and chill in the refrigerator.

Pan seared tuna with loquat salsa
      You will need two 6oz. tuna steaks about an inch thick salted and peppered on both sides; arugula leaves or any lettuce leaves will do; balsamic vinegar. Preparation and cooking is simple. Place the lettuce on a large plate. Heat a skillet until it is smoking then add the tuna steaks and sear on both sides to about ¼ inch. The middle will still be pink and just warmed. Move the tuna steaks to a plate and let them rest while you sprinkle the arugula (or lettuce) with balsamic vinegar. Slice the steaks into half inch slices and lay them over the arugula. Then top the tuna steaks with the loquat salsa—the more salsa the tastier.


      Here is the website where I found this recipe and others.


                                           *******************************************

Fool's Gold?

loquats and carrots
diced loquats added to
curdled pudding
      We also tried to concoct a desert using loquats and carrots with mixed success. In a blender we put about a cup of loquats (seeded with membranes removed) and about half that amount of sliced carrots; 200ml. heavy cream; 1 tsp. Lime juice; 2 or 3 tbs. Gum syrup; half a dozen mint leaves. When blended we got a smooth pale orange to light beige pudding. Unfortunately, we thought that it needed more loquat taste and added two or three more loquats and blended it a little more. For some reason, perhaps tipping the acid balance, the pudding curdled up, but still tasted fine. At any rate, we put the curdled pudding into a container and then added more diced loquats, folded them in, covered the container and put into the refrigerator to chill.


      When ready for desert we spooned some of the pudding into small glasses and garnished them with two halves of a seeded and de-membraned loquat, a loquat seed or two (for color not eating) and a sprig or two of mint. Didn't look so hot, but tasted very good, a little tart and not too sweet—just enough to complement the tartness of the loquat and its rather subtle flavor. Would have been better if the pudding hadn't curdled. But, tomorrow's another day.

Fool's Gold

Saturday, June 22, 2013

Call Me Mr. B. – Twelve

Grade 4

Sports Festival

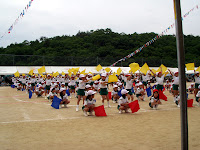
half time cheering event
     An event just shy of a sacred ritual takes place at our school every Spring in the month of May. It is known as UNDOKAI 「運動会」 in Japanese, which roughly translates as Sports Festival (or Field Day) in English. After a full month devoted to rehearsing for the big day it finally arrives with as little left to chance as possible.


synchronized dancing
        My first impression of the UNDOKAI opening ceremony was that of a military parade with martial music and banners flying in the breeze. It wasn't quite jackboot precision but still pretty impressive for kids from six to twelve years old. I could only think of the chaotic school yard activities of my elementary school in Kingston in the States and marvel at the order and precision that had been trained into these kids.

adoring parents capturing the memory
        As the big day approaches anxiety levels run pretty high among the staff. They worry about the weather since the festival is held near the start of the rainy season and the weather can be notoriously unpredictable. But mostly they worry about whether or not their students will put on a near-flawless performance and not shame them in front of their parents and other family members. Little or nothing is left to just spontaneous plain old fun. So, to me, after attending them year after a year they seemed to start to blur into a dreary sameness that only adoring parents could really get excited about.


tug-o-war - a great favorite
cooperative game - not as easy as it looks
        After the opening ceremony is finished, the rest of the day is for various sports and games activities as well as both synchronized and traditional Japanese dances and a big half-time razzle-dazzle cheering exhibition. The whole idea of this festival is to put great emphasis on the ideal of cooperative effort that has its wellsprings in the Japanese wet paddy rice culture. It may take a village to raise a child, but it certainly takes village cooperation to irrigate the paddies for wet rice growing. And so, even today as the rice paddies are being turned into parking lots (more profitable than growing rice nowadays), the spirit of cooperation remains a driving force in Japanese society. In that way, I think of UNDOKAI as a semi-sacred annual ritual.

the winner of the main event for each class level - the relay race

stick figure for the picture below
        Since the school and the parents invested so much capital into making a success of the Sports Festival, I incorporated a lesson for doing a Sports Festival picture as one of the Art class activities. Many students had a tendency to try to portray a sort of panoramic impression with ovals and stick figures running around the oval with little or nothing to capture and hold the eye. My goal in this lesson was simply to encourage the kids, by word and example pictures, to try and focus more on the human participants in an event and how their bodies actually move and look. I showed them how to make stick figures show different poses and then to flesh them out a bit to create an impression of motion, emotion and the nature of the event.

Oooofff...!


Tuesday, June 11, 2013

Call Me Mr. B. – Eleven

Grade 3

Paper Cone Owl – (Part 2)
(from 2-D to 3-D)

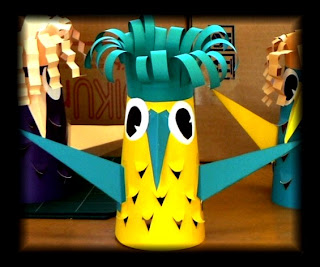
     In the second class we added the wings and beak of the owl. Since we wanted a 3-D effect, just as we had rolled the body into a cone shape, we had to fold the wings and beak to give them depth as well as a base to attach them to the cone body.

folded wings and beak and
curled tail "feathers"
        Since the children were familiar with origami, the Japanese art of folded paper, folding the wings and beak wasn't particularly difficult. But using a stapler in one hand while trying to hold the cone and wing in the other to attach it at the base of the wing was challenging enough for me to give them plenty of time to attach both wings and the beak. Of course, I assisted when and where necessary. I encouraged them to use the opposite color to the body cone for contrast and interest. The bottom tab on the folded wing was stapled to the body and the top tab cellophane taped. Both tabs on the beak (hidden under the eyes) were stapled.

        For the tail (protruding from behind the cone body) the leftover paper was further cut into five or six tapered lengths, curled by winding them on a pencil, stapled together and then stapled to the back of the cone body. That concluded the lesson for the second day.

                                                                             *********
     On the third and final day, the eyes were cut from black and white construction paper, glued together and then glued to the cone body on both sides of the beak, ideally covering the beak tabs thus hiding the staples. For the finishing touch, a “wig” was made and plopped into the top of the cone without attaching it. There was an array of different colored construction paper on a table pre-cut to the correct size. The children were free to chose any color they wished. It was interesting to see which ones had an eye for colors that matched harmoniously with the colors of their owls.

        I showed the kids how to make scissor cuts half way down their colored paper between 5 to 10 millimeters wide (about ¼ to ½ inches). Once that was accomplished they shape the head “feathers” as they liked. They could simply leave them straight, or curl them by wrapping on a pencil, or fold them into a zig-zag accordion pattern.


the "wig"
        Then I told them to bring the finished “feathers” to me and I fit it to the top cone opening and stapled it with one staple. The “wig” was then finished and the kid could plop it on the owl's head. When they were all displayed together in their classrooms they created quite a fanciful and colorful display.


Thursday, June 6, 2013

Call Me Mr. B. – Ten

Grade 3

Paper Cone Owl
(from 2D to 3D)

     The purpose of this three-week project was to create a three-dimensional object from a flat two-dimensional sheet of heavy paper and use a small cutter knife (exacto knife) to create an airy bas-relief effect. The use of a cutter knife, being very sharp and newly introduced as a tool used in crafts, was also a mini-lesson in using dangerous tools responsibly and safely.

        We used a fairly heavy weight though still flexible paper coated with two colors one on each side. I had prepared enough templates for each table that the four kids at the table had to share. Each table had one set of templates and four sheets of paper of different color combinations. The children were free to exchange papers, but only with other kids at their table (to prevent general pandemonium), if they wished

        The lesson was also one of waste not want not in relation to the material. The entire sheet of paper was used up if properly done with very little in the way of scrap. To this end the templates had to be laid out just so on the paper to achieve the maximum usability of the sheet. I drew a large rectangle the same shape as the kids' papers and drew and directed the proper placement of the template shapes. They then traced the shapes on their own papers. I had a sample attached to the whiteboard as well that looked like the picture on the right. The other side of the paper might be, say, yellow.

        The large fan-shape would be rolled into a cone and stapled to form the body. I didn't tell the students what we were making. Kids like to be held in suspense and try to guess what the object is going to be. Of course, from time to time I would ask if they knew what this was yet before I trotted out my sample for more detailed discussion and instruction. The large arrowhead shapes are for the wings and the smaller one the beak. The left over areas were later used to make a tail for the owl.

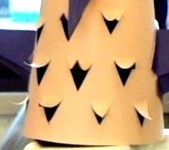
        Once the tracing was done, scissors were used to cut out the shapes and set aside the left overs. Now the fan shape was ready for the difficult new technique using the cutter knife. The idea was to cut V shapes in the lower center of the fan and curl them up with a pencil to create “feathers”. First, the paper had to be roughly divided into thirds. I showed the kids with a diagram of the fan on the whiteboard how to estimate “thirds” by drawing lines on the fan shape. The students then showed me their work and I adjusted as necessary.

        Using a cutting mat and a cutter knife on my own paper and a diagram on the board, I instructed the student to cut two lines in a V pattern by using two down strokes meeting at the bottom of the V and to create a pattern of eight to ten V cuts with space in between. I then showed them how to punch out the V shape and to use a pencil to curl the flap out and up. When they had successfully completed (and all of them did) the belly feathers they brought the cone to me.

        To make sure the body size was correct I had instructed to the kids to bring their cones to me and I would make the initial alignment of the straight sides and do the first two staples—top and bottom. I then told them to add two more staples toward the middle of the sides. When all the cones were finished we gathered the remaining shapes and the left overs and stapled them together and affixed them to the cone ready for the next lesson the following week.

To be continued...